Wednesday, May 27, 2015

May 2015 Favorites


Whew! What a busy month we have had! It feels like May just started, this month we focused on healthy living, and health awareness.Each week we had delicious recipes that were super healthy, and could be made by anyone. We also started selling our products at Tyee Wine Cellers. A local winery, that is just down the road from us. 

We started and finished trellising black raspberries. 


We had a huge announcement about our strawberries, click here if you missed it. 


These are some of the articles we found most interesting this month:

Cold, Flu, or Allergy? 

And this was our favorite recipe:

Rustic Strawberry Peach Tart 

Ingredients:

FILLING

  • 2 ripe peaches, peeled, pitted, sliced (not frozen)
  • 2 cups (about 300 grams) sliced fresh strawberries (not frozen)
  • 2 Tablespoons (30 grams) granulated sugar
  • 1 teaspoon vanilla extract

CRUST

  • 1 and 1/2 cups (190 grams) all-purpose flour (careful not to overmeasure)
  • 3 Tablespoons (45 grams) granulated sugar
  • 1/4 teaspoon salt
  • 1/2 cup (1 stick or 115 grams) cold unsalted butter, cubed*
  • 1/4 cup (60 ml) ice water, plus more as needed
  • 1 egg, beaten for egg wash
  • additional sugar for sprinkling

Directions:

  1. For the filling: Mix the peaches and strawberries together in a medium bowl. Add the sugar and vanilla, tossing well to coat the fruit. Set aside and allow the mixture to soak as you prepare the crust.
  2. For the crust: In a medium bowl, whisk the flour, sugar, and salt together in a medium bowl. Using a pastry cutter (or your hands), cut in the butter until the mixture resembles coarse, pea-sized crumbs. Add 1/4 cup of ice water, stirring with a fork until the flour is moistened. Add up to 2 more Tablespoons of ice water if the dough seems dry. Gently knead the dough a few times in the bowl until it all comes together. Shape the dough into a ball and flatten it into a thick disk, as pictured above. Wrap it in plastic wrap and refrigerate it for at least 1 hour.
  3. Preheat oven to 425F degrees. Line a large baking sheet with parchment paper or a silicone baking mat. Set aside.
  4. On a lightly floured surface, roll the dough into a 12-inch circle. Trim the rim of the circle to make a clean cut if desired. Transfer dough to the prepared baking sheet.
  5. Spoon the fruit (not the juices) into the center of the dough, leaving a 2-3 inch border all around, as pictured above. Gently fold the edges of the dough over the fruit, overlapping the dough as necessary. Press gently to seal the edges. Pour most of the reserved juices over the fruit, leaving about 1-2 Tablespoons behind. Too much juice and the dough will become soggy.
  6. Brush the crust with the beaten egg and sprinkle with sugar. Bake for 25-35 minutes or until the crust is golden brown, Remove from the oven and allow to slightly cool before serving.
  7. If you wish to drizzle with vanilla glaze, use the glaze recipe from here. Serve warm or at room temperature.

Additional Notes:

*Make sure your butter is very cold. I like to chill it in the freezer for about 15 minutes ahead of time.

Labels: , , , , , , , , ,

Monday, March 23, 2015

March 2015 Updates from Around the Farm


Spring is upon us!

We have been busy feeding our berries and getting them ready for spring. We are so excited to see those blossoms go into full bloom. The farm is so pretty then. Bob gave another soil talk here in Corvallis. Our hope is to soon make those talks available to you guys in one way or another. So something to look forward to! To see updates be sure to follow us on all our social media!
We have started applying foliar feedings to the Berry plants. A foliar feeding is used to supply the plant with minerals through the leaves and branches. We have found out that the leaves have microbes, just like the soil, that will digest these minerals making them more available to the plant. During different times of the year we help the plants grow or reproduce by the types of foliar minerals we have provided them. By understanding which minerals enhance growth or reproduction and the proper timing of each we can bring the plant closer to it's genetic potential (yield, nutrient density, sweetness and flavor). Every year we are learning more and more about how to use this very powerful tool.
Thanks to everyone who participated in our Very Lovely Giveaway last month, we hope to be doing more giveaways and contest in the future, so keep your eye out for them!


Office Hours

Even though it is almost spring our office is still on “winter” hours. We are open at the farm, Monday to Friday from 10 am to 4pm Pacific Time.

Better Shipping Rates are Still Available! 

Have a hankering for some delicious frozen berries, but don't want to pay an arm and a leg in shipping? We have great news! We are still able to ship by ground for our frozen berries! If your interested please give us a call at 541-752-0460 to place your order. We are unable to offer better shipping rates through our website, so you need to call us.
This offer also excludes Alaska and Hawaii, sorry guys. 

Leap into Spring!

Is the theme of this months Pinterest Board, where you can find so many decor ideas, yummy recipes, and  so much more!

Blueberry Power Muffins using Fresh/Dried Blueberries from Finger Prickin' Good

Ingredients:
  • 2 cups all-purpose flour
  • 1 cup oats–quick or regular oats
  •  2/3 cup sugar
  • 1 teaspoon baking powder
  • 1 teaspoon baking soda
  • 1/2 teaspoon salt
  • 1 1/2 cups honey nonfat Greek yogurt (I like Chobani)
  • 2 large eggs, lightly beaten
  • 4 Tablespoons unsalted butter, melted and slightly cooled
  • 1 teaspoon vanilla extract
  • 1 cup fresh blueberries (or try our dried blueberries)
Directions:
  1. Heat oven to 350°.
  2. Coat muffin tin with cooking spray or liners.
  3. Combine flour, sugar, oats, baking powder, baking soda and salt in a bowl.
  4. Combine yogurt, eggs, butter, and vanilla in a second bowl.
  5. Fold yogurt mixture into dry mixture; stir to combine completely.
  6. Gently fold in blueberries.
  7. Spoon into muffin tins (don't be afraid to fill them full).
  8. Bake until top is golden and springs back when you gently touch it, 20-25 minutes.

Strawberry Cream Cheese Pastries Inspired byDitehood


For the Pastries:
  • 1 package (8-ounces) cream cheese, softened
  • 2 sticks (16 tablespoons or 226 grams) butter, softened
  • 2 cups all-purpose flour
  • powdered sugar for dusting
  • ½ teaspoon salt
  • For the Filling:
  • 1 package (8-ounces) cream cheese, softened
  • ½ cup powdered sugar, or to taste (if you prefer it sweeter, add more)
  • 1 teaspoon pure vanilla extract
  • SVO strawberry jam
Directions:
  1. In your mixer's bowl, beat cream cheese and butter until smooth, light and fluffy.
  2. Add flour and salt and continue to mix until thoroughly combined.
  3. Lightly dust work area with powdered sugar.
  4. Transfer dough to work area and shape into a ball.
  5. Divide it into 4 rounds; flatten each round and cover each pastry dough with plastic wrap.
  6. Refrigerate for 30 minutes.
  7. In the meantime, prepare the filling by combining cream cheese, powdered sugar and vanilla in your mixer's bowl.
  8. Beat until creamy and smooth. Set aside.
  9. Dust work area with flour.
  10. Remove dough from fridge and let rest for 5 minutes.
  11. Roll out each ball of dough to a ¼-inch thickness.
  12. Cut into 3x3 squares.
  13. Fill the center of each square with ½-teaspoon cream cheese mixture and ½ teaspoon strawberry jam. For a prettier presentation, using a pastry bag, you can pipe the fillings, one on top of the other.
  14. Overlap opposite corners of dough to the center and over the filling. Pinch seams together.
  15. Refrigerate for 1 hour.
  16. Preheat oven to 375.
  17. Bake 10 to 11 minutes, or until edges are browned.
  18. Cool completely.
  19. Serve.


Labels: , , , , , ,

Sunday, February 8, 2015

Recipes of the Month

Cupid's Strawberry Float for Valentines Day inspired by Frugal Coupon Living

Ingredients:

  • Vanilla Ice Cream
  • Strawberry Soda
  • Whipped Cream
  • Maraschino Cherries (optional)
Directions:


  1. Place 2 scoops of vanilla ice cream in a glass.
  2. Slowly add strawberry soda  – it will foam a lot!
  3. Optionally you can add whipped cream and a cherry to the top.
  4. Serve with long spoon and straw.


Fruit Salad Cutouts inspired by Shari's Berries

"We all know that fruit should be cut into bite-sized pieces. But who wants to spend all day slicing apples? Grab the right tools for the job and make quick work of the task: an apple corer, a strawberry huller and a melon baller. Small cookie cutters work great for melons and also add a decorative element to the salad.
Ideally, all your fruit will be perfectly ripe. After all, no one wants a mouthful of mushy melon and tart strawberries. If you do end up with a basket of less-than-ripe fruit you can fix it with sugar. Sugar breaks down unripe fruit making it softer and sweeter. Take this hack to another level by using mint- or vanilla-infused sugar.
Keep it fresher in a salad spinner. Fruit salad gets juicier the longer it sits. The basket of a salad spinner will let the extra liquid drain and help the fruit stay crisp when stored overnight. Toss some of the juice back into the salad just before serving for extra sweetness or save it and make vinaigrette the next day."- Shari's Berries

Healthy Fruit Heart for Valentines Day Treat 
inspired by Sassy Dealz
"I came across this beautiful fruit platter that looks like a heart for Valentine’s Day! If you or your spouse aren’t chocolate lovers, this is the perfect alternative! All you need are fresh pomegranate seeds, strawberries, and blackberries. Fill the middle with the pomegranate seeds then cut strawberries in half. Surround the outside with those lovely blackberries! Mmm it looks so good doesn’t it?! “Heart healthy” is what love is about " - Sassy Dealz


For more recipes and inspiration check out our Pinterest 

Labels: , , , , , ,

Friday, February 6, 2015

February 2015 Updates


We have had quite a busy month here on the farm!

While we are still busy finishing up pruning our berries and are ready for the spring, we will start feeding our plants. Bob gave a talk to students at OSU this past month. We hope to make this available on our site very soon for those of you interested. We will be posting updates to our Facebook page with any new information about developments in that regard. 
Last month you might have noticed we tried something new for our newsletter layout and had a great response. Which is great! Thank you to all new subscribers and an even bigger thank you to all of our old subscribers! Keep an eye out for more simple changes we have coming to Facebook, Pinterest, and Twitter in this coming year. It’s going to be a great 2015! 

Office Hours 

Our office hours are still set to Winter, we are open Monday to Friday 10 am to 4pm Pacific time. 

Up Coming Events In February

If your near or live in Eugene, OR we are happy to say we will be doing some demos in your neck of the woods. For full details and updates, see our Facebook page under “events.” This is a great chance to come out learn about our products and get some tasty samples of products you might have not tried yet.

Better Shipping Rates are Still Available! 

Have a hankering for some delicious frozen berries, but don't want to pay an arm and a leg in shipping? We have great news! We are still able to ship by ground for our frozen berries! If your interested please give us a call at 541-752-0460 to place your order. We are unable to offer better shipping rates through our website, so you need to call us.
This offer also excludes Alaska and Hawaii, sorry guys. 

“A Very Lovely February” 

Check out this months Pinterest board which features fun valentines day ideas for treats, decor, and healthy alternatives! Click here to go to Pinterest. While your there follow our boards and our page, we love sharing all our great finds with all of you! 

Strawberry Cream Cake from Pretty, Simple. Sweet.


Ingredients
Cake:
  • 1 1/4 cups (170g/6oz) all-purpose flour
  • 1 1/2 teaspoons baking powder
  • 1/4 teaspoon salt
  • 1/4 cup (1/2 stick/56g) butter
  • 1/2 cup (120ml) whole milk
  • 3 large eggs, at room temperature
  • 1 cup (200g/7 oz) granulated sugar
  • 1 teaspoon pure vanilla extract
Whipped Cream:
  • 1 1/2 cups (360ml) heavy cream
  • 1/2 cup cream cheese or mascarpone cheese
  • 1/4 cup granulated or powdered sugar
  • 1 teaspoon pure vanilla extract
  • About 1 pound/450g fresh strawberries, cut into halves or quarters
Instructions
Preheat oven to 350F/180C. Grease 2 8-inch pans (read note if you have only one pan) and line the bottoms with parchment paper for easy release later on.
In a medium bowl, sift together flour, baking powder, and salt. Set aside.
In a small saucepan, combine butter and milk over medium heat just until butter is melted. Do not let it boil.
In a mixer bowl fitted with the whisk attachment, whisk eggs on high speed until combined and starting to foam, about 1 minute. Gradually add sugar and keep whisking until tripled in volume, about 6 minutes. Beat in vanilla.
Reduce speed to medium-low and add warm milk mixture into the egg mixture in a slow, steady stream. Add flour mixture in 3 additions and fold by hand using a rubber spatula just until combined.
Pour batter into prepared cake pans and smooth the top. Bake for 20-25 minutes, until the cake springs back when slightly touched and a skewer inserted into the center comes out clean. Allow cakes to cool on a wire rack for 15 minutes, then run a knife around the edges and invert the pan onto the rack. Let cool completely.
Without filling, cakes can be wrapped airtight and refrigerated for up to 5 days or frozen for 2 months.
For the whipped cream: In a mixer bowl fitted with the whisk attachment, whisk heavy cream with sugar and vanilla until stiff peaks form. Avoid overbeating.
Assembling the cake: Set one cake layer on a plate. Arrange about half of the strawberries in a single layer on top. Evenly spread 1/3 – 1/2 of the whipped cream over the strawberries, leaving a small border around the edge. Top with the second cake layer, this time spreading the whipped cream first and layering the strawberries on top.
Cake can be kept in the refrigerator for up to 1 day.
*If you have only one cake pan, scrape all batter into it. It will need more baking time. Once completely cooled, cut in half. If you refrigerate it first, the cake will be firmer and easier to cut.
*You can also make a 2-layer 6-inch cake with the same amount of cake batter. Bake in 2 6-inch pans for 30-35 minutes. You’ll need less whipped cream and strawberries.

Raspberry Lemonade Slice from Lick The Spoon

Ingredients
Crust:
  • 9 tbsp butter
  • 1/4 cup sugar
  • 1 cup flour 
  • 1 tsp vanilla essence
  • pinch of salt
Filling: 
  • 2 1/2 cups frozen raspberries, thawed
  • 1 cup sugar
  • 2/3 cup lemon juice (about 3-4 medium lemons)
  • zest of 3 lemons
  • 3 egg whites
  • 1 egg
  • 2/3 cup flour
  • pinch of salt, extra
Directions
Preheat the oven to 180C. Line and grease a 8x8 inch square baking dish.
To make the crust, cream together butter and sugar until light. Add the flour, vanilla and salt and mix until combined well. Do not over mix as this can make the base tough. Press the dough evenly into the bottom of the prepared baking dish. Bake for 20-25 minutes or until just golden brown. Remove from oven and cool.
To make the filling, place all thawed raspberries in a fine sieve and press them into a large bowl with the back of a spoon. Discard the caught seeds and skin. Add the sugar, juice, zest, whites, egg, flour and salt and combine, until well incorporated.
Pour the raspberry mixture onto the base and place in the oven. Bake for 30-35 minutes. Cool on the bench before placing in the refrigerator to set completely (about 3-4 hours) Cut and decorate as desired.
NOTES: This slice freezes well and makes a great dessert or afternoon tea to have handy for unexpected guests or dinner parties.


Labels: , , , , , , , ,

Friday, February 28, 2014

Home Garden Care: Strawberries


You can enjoy fresh strawberries during the summer from your garden, and the best part is they are relatively easy to take care of. Here are some tips and tricks if your new, or looking to learn more about growing strawberries.

Different varieties produce fruit at various times during the growing season. After your strawberries are finished producing fruit, usually in summer or fall, cut or mow the plants down to 1 or 2 inches above the crowns. When winter arrives, it's time to care for your strawberry plants by keeping them warm until spring. Cover strawberry plants once temperatures drop below 32 degrees Fahrenheit. Use 3 to 4 inches of loose mulch, such as straw or leaves. This is necessary in climates where winter temperatures are regularly below freezing. Remove mulch in spring when the strawberry plants start to grow again or when temperatures remain regularly above freezing.

Protect strawberry plants temporarily in warmer climates on unusual cold, freezing nights. In the evening, cover plants with a sheet of spunbound polyethylene, recommends University of Oregon, and remove it in the morning. A bed sheet or piece of burlap can suffice in a crunch.


Bring potted strawberries to a protected area where freezing temperatures are not an issue. Potted plants are not as insulated as ground plants and are more susceptible to winter injury. A covered porch, garage or basement might work well. If you cannot move the container, cover the plants with mulch as you would ground plants or drape a piece of burlap over top of the container.

Some other resources to consider:

Then with all your delicious berries you can try out this yummy recipe!
Strawberry Shortcake Pops
makes 12 popsicles
2 cups fresh strawberries, washed and hulled
1/2 cup crushed Nilla wafers
2 cups plain whole milk yogurt
1/3 cup honey (more if desired)
12 6 oz. Dixie cups
wooden popsicle sticks
In a medium bowl, combine the crushed Nilla wafers, yogurt, and honey. Set out 12 6 oz. Dixie cups, and fill each one with 2 tablespoons of the yogurt mixture. Set in the freezer to chill for 30 minutes.
Meanwhile, in a blender or food processor, puree the berries. Divide the berries among the 12 cups, and freeze for another 30 minutes.
Finally, divide the remaining yogurt mixture among the cups, add a popsicle stick to each one, and chill completely, several hours or more.
To serve, simply cut or tear the cup off. 

From Babble


Labels: , , , , , , , , , , , , ,

Friday, February 14, 2014

Something Sweet for Your Sweet Heart


Strawberries have become a romantic an iconic treat for Valentines day, so if you want a treat for yourself or for your sweetie here are some delicious recipes to lend some inspiration.

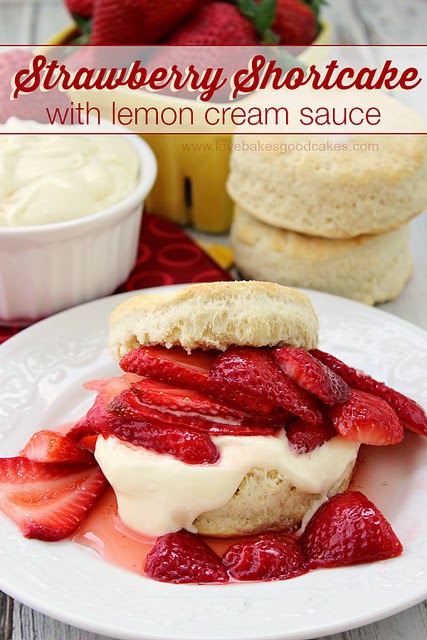
Strawberry Shortcake with lemon cream sauce

For the strawberry filling:
1 quart strawberries, sliced
½ cup sugar

For the shortcakes:
⅓ cup shortening
2 cups all-purpose flour
2 tbsp. sugar
3 tsp. baking powder
1 tsp. salt
¾ cup milk
Additional sugar, for topping (if desired)

For the lemon cream:
½ cup lemon curd
½ cup heavy whipping cream

Mix strawberries and with the ½ cup of sugar. Let stand for at least an hour.

Preheat oven to 450°F. 

In a medium bowl, cut the shortening into the flour, 2 tbsp. sugar, baking powder and salt until the mixture looks like fine crumbs. Stir in milk just until blended.

Turn the dough out onto a lightly floured surface. Gently knead 20-25 times. Roll out into ½-in. thickness. Cut with a 3-in. floured biscuit cutter. Place shortcakes about 1-inch apart on an ungreased baking sheet. Sprinkle tops with additional sugar, if desired. Bake 10-12 minutes or until golden brown.

Place the lemon curd and heavy whipping cream in a medium bowl. Beat with an electric mixer on high speed until thickened, about 3-5 minutes.

Split shortcakes horizontally. Place shortcake bottoms on serving plates. Top with lemon cream sauce and strawberries. Replace tops. Serve immediately.


Strawberry Cannoli Parfaits with Pistachios
Ingredients
           1 pound of strawberries, hulled and sliced
  • 3 Satsuma Oranges, freshly squeezed
  • 1 cup heavy cream
  • ½ cup confectioners sugar
  • 1 cup ricotta
  • ? cup pistachios, chopped roughly
  • 1 package Amaretto D’Italia cookies (200g/7.05oz Matilde Vicenzi), crushed
Instructions
  • Cut up your strawberries. Slice oranges in half and squeeze the juice over the berries. If your oranges are large you could cut this down to 2.
  • Place the berries in a glass container and stick in the fridge for about 2 to 4 hours. Give it a shake every hour if you can.
  • Now in a mixer combine your heavy cream and confectioners sugar. Whip until peaks form.
  • Place your ricotta in a large bowl. Stir in ½ the whipped cream and mix a bit. Then add other ½ and fold it in.
  • Place a layer of crushed cookies in the bottom of your glasses.
  • Add a layer of strawberries.
  • Add a light layer of pistachios.
  • Add a layer of cannoli cream.
  • Repeat steps for a second layer.
  • Top with chopped pistachios.
  • Add a strawberry garnish on top.
  • Refrigerate for about an hour or more.
  • Serve with a big old strawberry, cannoli-y, pistachio smile

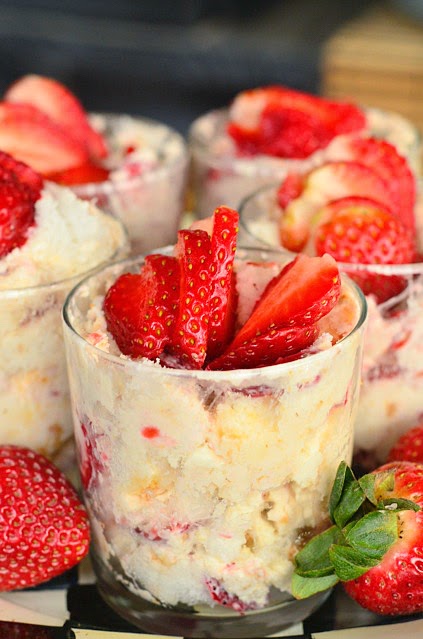
STRAWBERRY LEMON CHEESECAKE PARFAITS

PREP TIME: 10 
Buy these simple ingredients, mix together in a large bowl, fill parfait glasses, refrigerate, and serve! You can buy a pre-made angel food cake, too!

INGREDIENTS:

2 cups heavy whipping cream
1/2 cup powdered sugar
1 tsp. vanilla
8 oz. container mascarpone cheese
1/2 cup lemon curd
1 lb. or more of strawberries
1 whole angel food cake

DIRECTIONS:

Whip the heavy cream on high, adding in the powdered sugar and vanilla. Add the mascarpone cheese and lightly mix.
Fold in the lemon curd.
Cut the angel food cake into pieces.
Slice the strawberries (I use an egg slicer.)
Mix all ingredients together in a large bowl. Top with more berries.
Serve cold.

Labels: , , , , , , ,

Thursday, December 13, 2012

Santa Inspired Goodies

Christmas is 11 days a way and that means lots of holiday parties. We have been looking for some yummy deserts that would be great to serve at these parties. Enjoy!

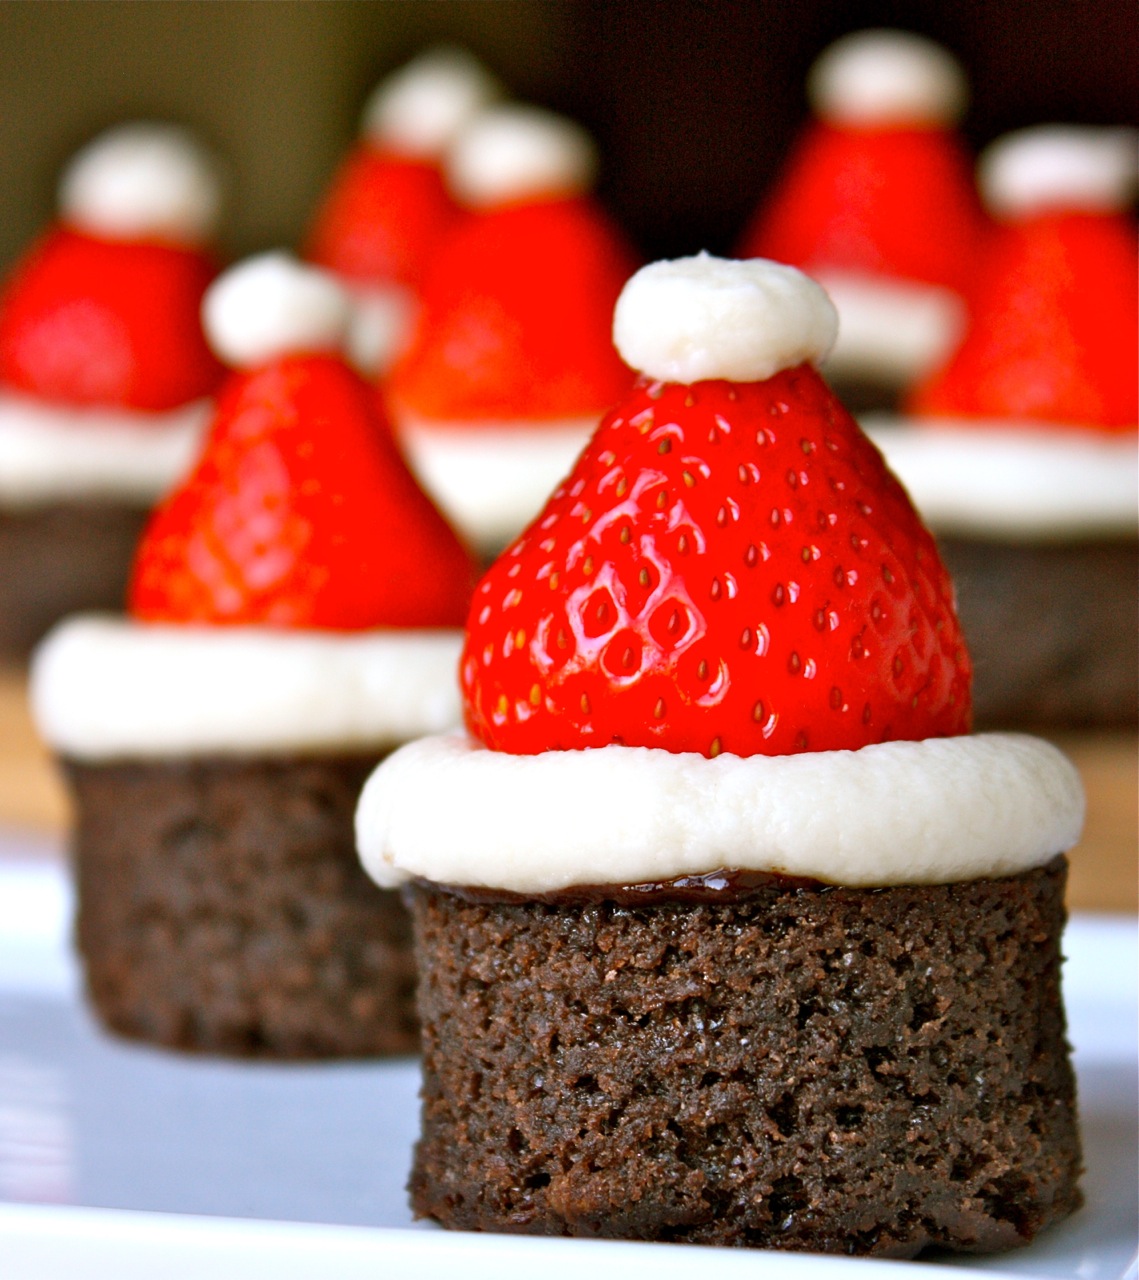
Santa Hat Brownies
Yields 12-16 brownies
Ingredients:
1 pan of your favorite brownies, cooled and cut into desired size and shape (I used a round cutter)
12-16 small strawberries, cleaned and hulled
vanilla-mascarpone buttercream (recipe below)

Mascarpone Buttercream
Ingredients:
1/2 cup (1 stick) unsalted butter, room temperature
8 ounces mascarpone cheese, room temperature
2-1/2 to 3 cups powdered sugar
2 teaspoons vanilla extract
pinch of salt

Method:
Using a stand mixer with a paddle attachment, beat butter and mascarpone cheese until light and creamy, about 2 minutes.  Add vanilla extract and salt.  Add 2-1/2 cups of sugar, half a cup at a time and continue beating until smooth.  Add more sugar, if needed to reach desired consistency and sweetness.

To assemble, pipe a ring of vanilla buttercream on top of each brownie.  Cut off the base of a strawberry so it is flat and place it upside down on each brownie, pushing slightly to secure in place.  Top the tip of the strawberry with a dot of buttercream to finish the santa hat.
From Daisy's World via Pintrest.  

Strawberry Santa 

Ingredients:
1 pound of strawberries
Cool Whip
You may want something to make eyes for Santa, such as black food coloring.

Directions: 
1. Wash the strawberries and lay them on a paper towel to completely dry
2. Cut off the stem end so the berry will sit flat.
3. Cut off the tip of the berry, being careful not to cut off too much or it will become top-heavy. Then core just a little bit out of the tip end because more cool whip is BETTER.
4. Then you will need a star tip and possibly a round tip.
5. Using the star tip, put a little in the berry as it sits flat. If you put in too much, the “hat” will fall off. Then, taking the round tip put a tip on top of the hat and two little buttons. 
6. You have to work fast because the tiniest amounts of heat will them to begin melting. They only took 15 minutes and about $6 to make. 
From The Domestically Impaired Guide to the Retro Kitchen Arts via Pintrest


Labels: , , , , , ,