Thursday, March 1, 2018

Revamped website launch FAQ


If you've been to our site recently you might have noticed that things look a bit different! We are so happy to launch our revamped site and to share with all our customers. So we thought we would make a quick little post with some important information for new & returning customers. Hope this information helps, if you have any additional questions please feel free to contact us!

Q: Are you guys still selling all the same products?

A: Yes, with very few exceptions. We took down some of the gift boxes because we are moving them to be more seasonal.

Q: I'm a returning customer, do I have to make a new account?

A: No. You should be able to use your old username & password to log in. (If you encounter problems, please contact us and we will help you the best we can.)

Q: Are your shipping prices remaining the same? 

A: Unforentually no, as of January 1, 2018, we adjusted our shipping prices to reflect what we are being charged from FedEx & USPS (From the old site to the new one the shipping prices would look the same, but if you haven't visited our site in awhile you might notice the difference). We do not make any money on our shipping and pass whatever savings we do get on to our customers, we feel this is the most honest and fair option.

Q: I found a bug with the site, what should I do?

A: Please contact us about it! We have been working on this for months and feel like we have still overlooked things, the more pairs of eyes the better! If you have already reported a bug to us, we would really like to say a great big THANK YOU. You've no idea how much it's been helping us!

Q: Some of the product images look a bit...well...wonky...

A: Yes, we're aware. We are in the process of creating brand new images to reflect current packaging & hope to have those images up by the second week of March 2018.

Q: Are you having any kind of launch celebration?

A: YES! Of course! Use code NEWSITE18 at check out & get 20% off Dried & Powders. The sale will run from 2/28/18 through 3/31/18. (One offer per order, to qualify for free shipping order must be over $235 AFTER coupon & only eligible product apply)


Labels: , , , , , , , , , ,

Monday, December 4, 2017

Happy National Cookie Day!


Who doesn't love cookies? 


We definitely do, but where cookies even came from? Or who makes up all these random holidays? Well, we looked it up! (Thanks, Google!)

 Turns out the English word "cookie" is derived from the Dutch word "koekie" which means little cake.  There have been cookie-like wafers in existence for as long as baking has been documented, their ability to travel well made the quite popular, however, they weren't nearly as sweet as the common cookie. The origin of the cookie seems to be in Persia in the 7th century, soon after the use of sugar became popular in the region. After that, they spread to Europe through the Muslim conquest of Spain. Cookies were common at all levels of society throughout Europe by the 14th century, from the royal cuisine to the street vendors. Cookies arrived in America in the 17th century. Macaroons and gingerbread cookies were among the popular early American cookies.

In 1976, Sesame Street included National Cookie Day on its calendar for the first time on November 26. The Cookie Monster also proclaimed his own National Cookie Day in the 1980 book The Sesame Street Dictionary. Then in 1987, Matt Nader of the Blue Chip Cookie Company out of San Francisco created Cookie Day celebrating it on December 4.

So, how can you celebrate National Cookie Day, and still eat healthily? Our Clean Eating Blueberry Oatmeal Cookies are a great option! 

Blueberry Oatmeal Cookies


These cookies are soft and extra chewy! Our dried blueberries add a bright and sweet burst, while the warm cinnamon and oats provide a comforting backdrop. They'll stay soft for up to a week if stored in an airtight container.


Yields About 15 Cookies

Ingredients:

1 Cup instant oats
3/4 Cup Whole Wheat Flour
1 1/2 tsp baking powder
1/2 tsp ground cinnamon
2 tbsp coconut oil, melted
1 large egg, room temp.
1 tsp vanilla extract
1/2 Cup honey
1/4 Cup Sunset Valley Organics' Dried Blueberries

Directions:

1. In a medium bowl, whisk together the oats, flour, baking powder, cinnamon, and salt. In a separate bowl, whisk together the coconut oil, egg, and vanilla. Stir in the honey until thoroughly incorporated. Add the flour mixture, stirring just until combined. Fold in the blueberries. Chill the dough for at least 30 minutes. (If chilling longer, cover with plastic wrap, ensuring it touches the entire surface of the cookie dough.)

2. Preheat the oven to 325°F, and line a baking sheet with parchment paper or a Silpat.

3. Drop the cookie dough into 15 rounded scoops on the baking sheet. (If chilled longer than 1.5 hours, flatten each slightly.) Bake at 325°F for 13-15 minutes. Cool on the baking sheet for at least 15 minutes before turning out onto a wire rack.

Happy National Cookie Day! 

Labels: , , , , , , , , , , ,

Saturday, November 25, 2017

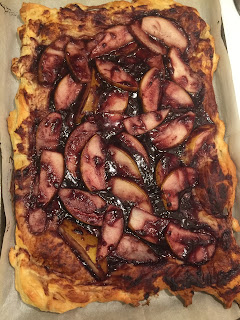
Blackberry & Pear Tart


Sometimes all you want to do is throw together a quick, delicious dessert, and that is exactly what our Blackberry & Pear Tart is. We made this three-ingredient tart the week of Thanksgiving and it was perfect to get into the holiday mood.


Ingredients:

  • 1 box of Pillsbury puff pastry sheets (or other puff pastry, this is just what we used)
  • 10 oz jar of Sunset Valley Organic Blackberry Spread
  • 4 pears, thinly sliced (we used a mix of red and green pears)
*Optional: 1 egg for washing the sides of the puff pastry


Directions:

1. On a parchment-lined baking sheet unfold puff pastry sheets. Set aside. 
2. In a bowl place sliced pears and carefully fold in blackberry spread, until pears are coated evenly.
3. Carefully pour pear and blackberry mixture onto the puff pastry sheets, and arrange to your liking. 
4. Optional: Wash sides of pastry sheets with egg for a golden brown effect. 
5. Bake at 375 degrees F for 30 minutes or until pastry is golden brown.
6. Let cool 10 minutes & serve. 

Leftovers can be kept in an airtight container in the fridge for up to one week. 

Labels: , , , , , , , , , , , , , , ,

Monday, September 18, 2017

Blueberry Breakfast Cake

Previously seen in our January 2017 newsletter, it's finally making it's way to the blog! Better late than never? This week we transition from Summer to Fall officially, but we can't say bye to fresh blueberries just quite yet! 
"A deliciously moist, lightly sweet "coffee" cake bursting with juicy ripe blueberries."
INGREDIENTS
  • ½ cup unsalted butter, room temperature
  • Zest from 1 lemon
  • ¾ cup granulated sugar
  • 1 large egg, room temperature
  • 1 teaspoon pure vanilla extract
  • 2 cups unbleached all-purpose flour (divided)
  • 2 teaspoons baking powder
  • ½ teaspoon sea salt
  • 2 cups fresh, ripe blueberries
  • ½ cup buttermilk
  • 1 teaspoon turbinado sugar for sprinkling
INSTRUCTIONS
  1. Preheat oven to 325 degrees.
  2. Lightly grease and flour an 8-inch springform pan. Set aside.
  3. In a small bowl combine the flour, salt, and baking powder. Remove two tablespoons of the flour and set aside.
  4. In the bowl of a stand mixer combine the butter, lemon zest and ¾ cup of sugar. Beat for several minutes, scraping down the sides as needed, until light and fluffy.
  5. Beat in the egg and vanilla just until incorporated.
  6. Add ⅓ of the flour mixture to the creamed butter and sugar. Beat on low until incorporated. Add ⅓ of the buttermilk and blend until smooth. Repeat adding ⅓ of the flour then ⅓ of the buttermilk until both are incorporated. Remove the bowl from the mixer.
  7. Toss the blueberries with the reserved 2 tablespoons of flour. Gently fold the blueberries and any extra flour into the batter using a rubber spatula. Take care not to rupture the blueberries.
  8. Pour the batter into the prepared pan and spread evenly. Sprinkle with the turbinado sugar and bake in a 325 preheated oven for 40-45 minutes or until the top is lightly browned and a toothpick inserted in the center comes out almost clean.

Labels: , , , , , ,

Wednesday, September 6, 2017

Nectarine & Aronia Berry Tart


Original posting is over on The Unicorn's Delight, be sure the site for even more delicious healthy recipes!

"There are tons of unlikely duos out there when it comes to food. Such as cheese & jelly, chocolate & salt, broccoli & Cheetos, Mango & chili, goat milk & caramel, sriracha & peanut butter. A personal favorite of mine is peanut butter and pickle sandwiches-it’s an acquired taste, I’ll admit, but so good! Well, I seem to have stumbled upon another unlikely duo; Nectarines and Aronia berries! They are delicious together.

Aronia berries are being harvested all over the united states right now. If your unfamiliar with this super fruit, it’s not surprising. While they are king of the super berries, they also pack quite a punch with an earthy, astringent flavor that typically drys out the mouth, think like a dry wine. They are also known as chokeberries, native to mid-west America, for years they have been seen as a weed, and removed from farm lands. However now, with the discovery of their nutritional value, farmers are planting them like crazy. If you live outside of the mid-west you might find them in your yard, because they have been commonly used in landscaping.
Some of the health benefits Aronia berries can offer are:
  • Urinary Track Health
  • Improve Blood Circulation & Strengthen Blood Vessels
  • Balance of Blood Pressure Levels
  • Prevention and help in treatment of diabetes
  • Gastro Protective Effect
  • Anti-Carcinogenic Effect
  • Anti-Inflammatory Properties, Suppress Viruses
  • Eyes Protection
  • Weight Control
Sunset Valley Organics is doing something unique with their plantings of aronia berries. They are applying what they call biological farming practices, which basically means they are putting minerals back into their soil, remineralizing it, which they have seen healthier plants, more nutritional fruit, the plants are able to defend themselves from insects and disease, and most recently they are finding their aronia berry plantings have less of that earthy, astringent flavor, even though the tannins in the skin that cause the astringent flavor are still there.
How can that be? Well it’s from the minerals doing their job, and interacting in such a way that the plant is producing fruit that has a higher sugar content, or Brix. (Brix is the standard unit of measure for sugar content.)  That natural sugar is over riding the tannins and making them have a mild flavor. This year Sunset Valley Organics is seeing their aronia berries having an average of 26 brix, compared to last year they had 22, and the average, conventional aronia growers hit somewhere between 15-19.
The first time I ever tried an aronia berry I had to spit it out. It was so gross tasting to me, and it was around 19 Brix, the tannins were over powering, and it felt like I was eating literal dirt. Not a good experience. But when I tried last years crop from Sunset Valley Organics, I could actually eat them. It was so surprising! I started using them in baking and smoothies. My favorite recipe I’ve found is Oatmeal Aronia berry cookies, so good, and can be a healthy snack! 
So now with berries that are around 26 brix I’ve started incorporating them into other forms of baking, like today’s recipe! Because Aronia berries aren’t common at all, it’s important to experiment and play with them.

SO LET’S GET TO THE GOOD STUFF, THE RECIPE!


What You’ll Need:
  • 5-6 medium sized nectarines, sliced
  • Pie Crust- You can use store bought or my recipe (below) for a healthier version.
  • 1 Cup fresh/frozen Sunset Valley Organic’s Aronia Berries
  • 1/4 cup Thick apricot jam
  • 3/4 cup water
Pie Crust Ingredients:
Coconut Pie Crust- Makes 1 full pie crust (top & bottom)
  • 1 cups unbleached all purpose flour
  • 1 cup coconut flour
  • 1/2 tsp sea salt
  • 2/3 cup (160 g) coconut oil, scoopable (not liquid)*
  • 3-6 Tbsp (45-90 ml) ice cold water
What You’ll Do:
Pie Crust:
  1. Add flour and salt to a large mixing bowl and whisk to combine.
  2. Next add coconut oil in spoonfuls (see photo) and use a pastry cutter (or fork) to cut the two together, until it resembles wet sand – about 30-45 seconds.
  3. Add ice cold water 1 Tbsp at a time and use a wooden spoon to gently mix. Add only as much water as needed to help it come together and form a dough – about 3-4 Tbsp.
  4. Use your hands to gently knead/form the dough in the bowl and gather any loose scraps. Then transfer directly to a well-floured surface and form into a disc with your hands.
  5. Lightly flour the top of the dough, as well as a rolling pin, and gently roll into a circle the shape of your pie pan, about 1/8-inch thick. Add more flour as needed to prevent sticking. It’s fairly forgiving, so if it cracks, just patch it up with slightly wet fingers and reform.
  6. If using a standard 9-inch (or similar size) pie crust, simply use the rolling pin to roll up crust and drape it over the pan. Form the edges simply (avoiding too tall of edges or fancy designs as the coconut oil doesn’t hold it as well as butter) and add filling of choice. Roll out remaining crust, drape over the top of pie, and seal (optional).
Note: To save uncooked dough for future use, wrap in plastic wrap and set in the refrigerator for 2 days, or in the freezer for up to 2 weeks. Thaw before using.
 Tart filling: 
  1. Pre heat oven to 375 F. Start with pie dough rolled out on to a baking sheet. We did a nine inch pie crust.
  2. Lay sliced nectarines one inch from the edge of the pie dough in a circular pattern, layering until all pie dough is covered.
  3. Fold 1 inch edge of dough on top nectarines, and pinch to stay in place.
  4. Evenly distribute the aronia berries on top of the nectarines.
  5. In a small pot bring apricot jam and water to a slow boil, until well combined and is a thin mixture.
  6. Brush evenly on top of nectarines and aronia berries.
  7. Bake for 40 to 45 minutes, or until golden brown appears on pie crust.
  8. Let cool 5 minutes, serve warm & enjoy!"


Labels: , , , , , , , , , , ,

Tuesday, August 29, 2017

Fresh Blackberry Cake with Butter Cream Frosting


Summer is winding down in Oregon, and most of our harvest is over. We just have aronia berries left. This summer went so fast, but the weather was also so weird and caused all of our crops to be much later than expected. The only crop that was "on time" was our raspberries. This past week we wrapped up harvesting on our blackberries, and with the few last fresh ones we made this delicious cake to celebrate a harvest well done.

We used a white sponge as a base for our cake, with layers of buttercream and fresh blackberries bursting with sweetness in the middle of the cake.

Ingredients: 

For the Cake

  • 1 C Salted Butter, Softened
  • 1 1/2 C Sugar
  • 2 TSP Almond Extract 
  • 3 1/2 C Flour
  • 4 TSP Baking Powder
  • 1/2 TSP Salt
  • 6 Large Eggs,  Room Temp
  • 1 1/2 C Milk, Room Temp
For the Frosting

  • 1 1/2 C Butter, Softened
  • 1 1/2 TSP Vanilla Extract
  • 6  C Powdered Sugar
  • 6 TBSP Heavy Whipping Cream
  • Food Coloring (optional)
  • Extract for Flavor (optional) 
We used about 2 cups of fresh Blackberries, our cake is 9 inches in dimeter. You can use more or less depending on your cake size and shape. 

Directions: 


    1. Grease three 9-inch pans. Line the bottom with parchment paper. Preheat an oven to 350 degrees F.
    2. In a large mixing bowl, use a hand mixer to cream the butter and sugar together. Beat in almond extract.
    3. Use a fork to combine the eggs and milk together in a bowl or 2 cup liquid measuring cup. Set aside.
    4. In another mixing bowl stir together cake flour, baking powder, and salt.
    5. Add ⅓ of the dry ingredients to the butter mixture and mix in until just combined. Add in half of the milk mixture and combine. Add in another ⅓ of the dry ingredients until combined followed by the remainder of the milk mixture. Add in the remainder of the dry ingredients and mix with the hand mixer until just combined, using a rubber spatula to scrape the sides and bottom to make sure everything is mixed in.
    6. Divide the batter among the three prepared pans. Bake at 350 for 25 to 30 minutes. Let sit in pans for 5 minutes and then transfer to a wire rack to cool completely before layering and frosting. 
    7. To make the frosting: Use mixer (hand or stand) to whip softened butter and vanilla extract together. Slowly add in powdered sugar, about 1 cup at a time. Thin out with milk if it gets too thick.

Labels: , , , , , , , , ,